
Custom embroidery can turn an ordinary cap into a professional piece of branded merchandise, teamwear, promotional clothing, or fashion headwear. But one question comes up again and again when designing an embroidered cap: how much embroidery can actually fit on a cap?
The answer depends on several factors, including the cap style, available embroidery area, design shape, stitch density, lettering size, panel construction, and the position where you want your artwork embroidered.
While it may be tempting to make your logo as large and detailed as possible, bigger does not always mean better. A well-designed embroidered cap needs enough space around the artwork for the stitching to remain clean, readable, and visually balanced.
At Custom Cap UK, we help businesses, fashion brands, sports teams, organisations, and individuals turn logos and artwork into high-quality custom embroidered caps. Our range includes baseball caps, trucker caps, snapbacks, fitted caps, dad caps, 5-panel caps, 6-panel caps, and other personalised headwear.
In this guide, we explain how much embroidery can fit on different parts of a cap, what determines the maximum embroidery size, why extremely detailed artwork can be challenging, and how to create a design that looks professional when stitched.
What Is the Standard Embroidery Area on a Cap?
There is no single embroidery size that works for every cap.
A cap’s usable embroidery area depends on its construction. The front panel, for example, is generally the largest and most popular location for embroidery. However, the available space can change depending on whether the cap has five or six panels, how high the crown is, where the seams sit, and whether the cap is structured or unstructured.
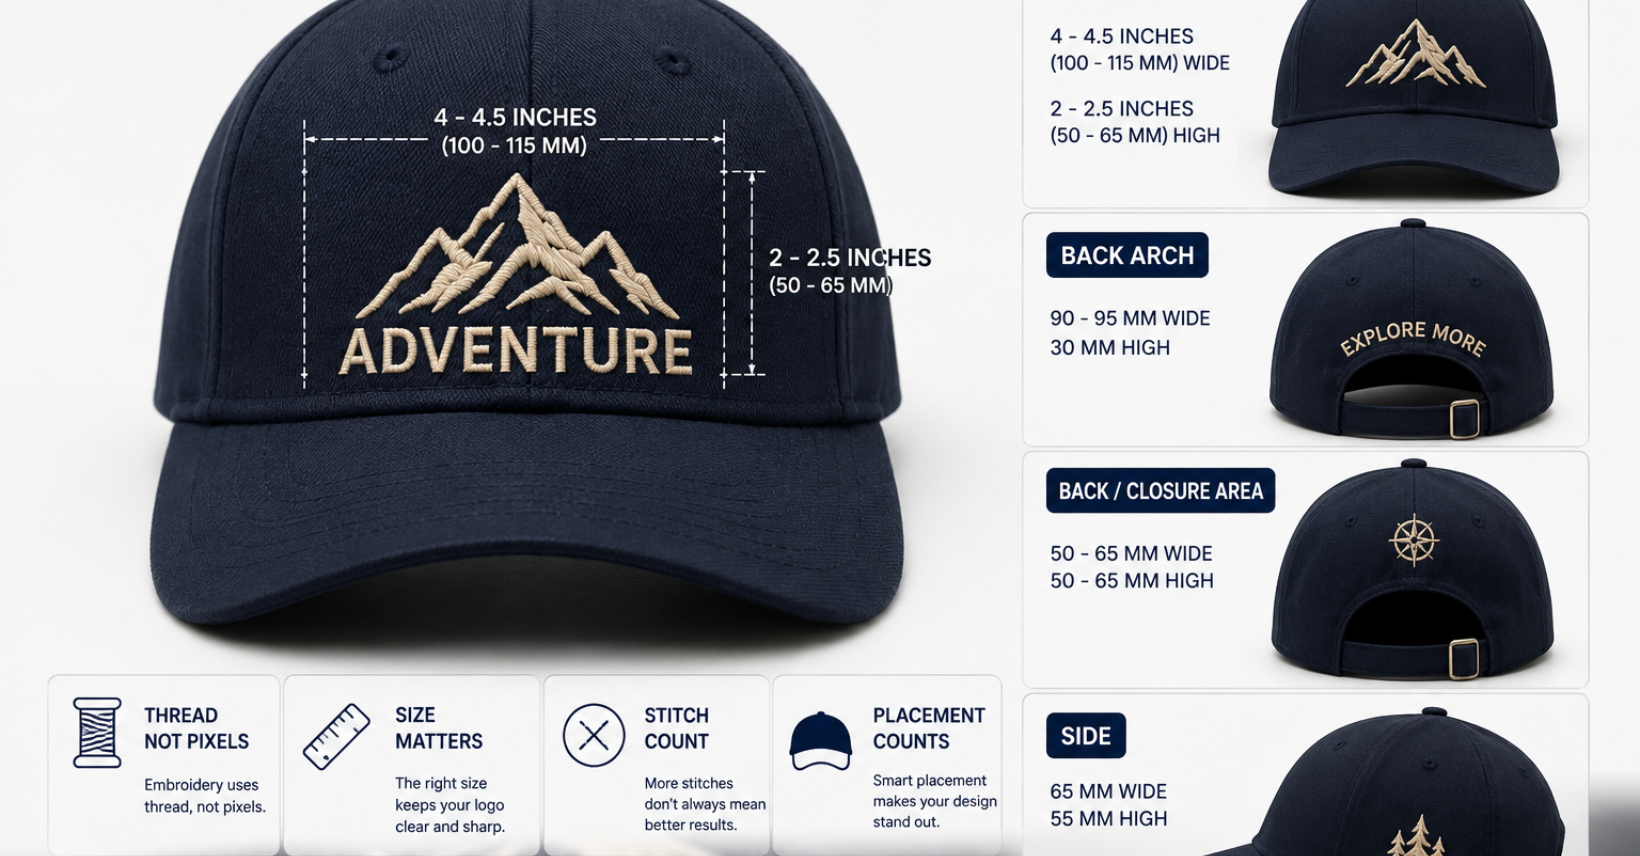
As a general starting point, many cap embroidery applications use a front design approximately 4 to 4.5 inches wide and around 2 to 2.5 inches high. Some caps may accommodate larger or differently proportioned designs, but the actual usable area should always be checked against the specific cap style.
Some professional embroidery providers recommend working within approximately 155mm wide by 65mm high for a standard front cap embroidery area, although this varies between cap models.
This means that when someone asks, “How much embroidery can fit on a cap?”, the better question is:
How much embroidery can fit on this particular cap without compromising the quality of the design?
That distinction is important.
A design may technically fit within a particular measurement but still look poor if it contains tiny lettering, extremely thin lines, excessive stitch density, or too many small elements.
How Large Can Front Cap Embroidery Be?
The front of the cap is usually the best location for a larger embroidered logo.
For many standard caps, a practical front embroidery area is around:
- Width: 4–4.5 inches
- Height: 2–2.5 inches
- Approximate metric width: 100–115mm
- Approximate metric height: 50–65mm
These are general guidelines rather than fixed rules.
A wide horizontal logo might use almost the entire available width while remaining relatively short. A circular logo might be smaller in width but taller. A wordmark could be designed to stretch across the front panel, while a compact symbol may only need a fraction of the available space.
For example, imagine a company logo containing a simple icon and the company name underneath. Instead of automatically enlarging the entire logo, the artwork can be proportionally adjusted so that the name remains readable and the icon remains visually strong.
This is why professional embroidery digitising matters.
The embroidery file is not simply a digital image copied onto the cap. It needs to be converted into instructions that tell an embroidery machine how to create the design using thread.
The digitising process determines stitch direction, density, underlay, sequencing, thread changes, and other technical characteristics.
Does a Bigger Embroidery Design Always Look Better?
No.
One of the biggest mistakes people make when ordering embroidered caps is assuming that the maximum possible size is automatically the best size.
A larger design can be more noticeable, but excessive embroidery can make a cap look crowded. It can also increase stitch density and production complexity.
For example, a simple wordmark may look excellent when enlarged across most of the front panel. A highly detailed illustration may look better at a slightly smaller size because the individual elements need breathing room.
The goal is not to fill every available millimetre.
The goal is to create clear, balanced, readable embroidery.
A professional embroidered cap should have enough empty space around the design to separate it visually from the cap seams, brim, and edges.
How Much Embroidery Can Fit on the Back of a Cap?
The back of a cap has a smaller and more specialised embroidery area.
The most common location is the back arch above the adjustable closure. This area is particularly suitable for:
- Short slogans
- Company names
- Website addresses
- Small logos
- Team names
- Initials
- Brand messages
- Short phrases
Back embroidery generally works better when the artwork is compact and horizontal.
For example:
CUSTOM CAP UK
would be much more suitable for the back arch than a large detailed illustration.
Depending on the cap and its closure, back embroidery areas can vary considerably. One professional cap embroidery guide gives examples of approximately 50mm × 65mm for one back area and around 95mm × 30mm for another, demonstrating why the exact cap construction matters.
If you want text around the back arch, curved lettering can also be used to follow the shape of the cap.
However, very small text should be avoided.
Embroidery thread has physical limitations. If letters are reduced too far, individual stitches can overlap or become difficult to distinguish.
For readable embroidered lettering, some embroidery specialists recommend keeping letters around 8mm high or larger, depending on the font and stitch design.
How Much Embroidery Can Fit on the Side of a Cap?
Side embroidery is a popular option for brands that want a more subtle design.
Rather than placing a large logo directly at the centre front, you can add a small brand symbol, initials, flag, number, or icon to the left or right side.
The side area is much more restricted than the front.
A typical example of a usable side embroidery area is around 65mm wide × 55mm high, although the actual space varies by cap construction.
Side embroidery works particularly well for:
- Small brand logos
- Initials
- Symbols
- Flags
- Sports team marks
- Numbers
- Minimalist graphics
It is usually better to keep side embroidery simple.
A detailed illustration with multiple tiny components may lose clarity when reduced to fit the side panel.
If your artwork contains many details, we may recommend simplifying the design or moving the main artwork to the front.
Can You Embroider the Front, Side and Back of a Cap?
Yes.
A cap does not have to contain embroidery in only one location.
You can combine different embroidery placements to create a more complete branded design.
For example:
Front: Main company logo
Side: Brand initials
Back: Website or slogan
This approach is especially useful for fashion labels, corporate uniforms, sports teams, clubs, events, promotional merchandise, and businesses that want their branding visible from multiple angles.
However, adding more embroidery locations increases the overall amount of stitching and production work.
It is therefore important to consider whether every placement adds value.
Sometimes a strong front logo combined with a small back message looks more premium than covering every available surface.
How Stitch Count Affects How Much Embroidery Can Fit
Embroidery size is only one part of the equation.
Another important factor is stitch count.
Stitch count refers to the number of stitches required to create an embroidery design. A simple logo may require only a few thousand stitches, while a larger and more complicated design can require significantly more.
As a general industry example, front cap embroidery commonly falls around 5,000–12,000 stitches, with simple logos often requiring fewer and dense or detailed designs requiring more.
Stitch count can affect:
- Production time
- Thread consumption
- Design density
- Embroidery cost
- Overall appearance
- The amount of detail possible
However, stitch count should not be treated as a strict maximum.
Two designs with the same physical dimensions can have dramatically different stitch counts.
A large outline logo might use relatively few stitches. A heavily filled illustration occupying the same space could require many more.
This is why embroidery artwork needs to be evaluated individually.
Why Tiny Details Are Difficult to Embroider
One of the biggest limitations of cap embroidery is extremely small detail.
Digital artwork can contain tiny lines, miniature text, gradients, shadows, and intricate shapes. Thread behaves differently.
When an image is converted into stitches, extremely small elements may become difficult to reproduce accurately.
For example, imagine a logo containing:
- Very thin outlines
- Small text
- Tiny stars
- Fine facial details
- Narrow gaps
- Complex patterns
At large digital dimensions, these elements may look perfect.
When reduced to a cap-sized embroidery design, they may become crowded.
Professional embroidery guidance commonly recommends avoiding extremely thin elements and keeping line thickness sufficient for the thread to reproduce cleanly.
This does not mean detailed designs cannot be embroidered.
It means they may need to be redrawn or simplified specifically for embroidery.
What Is the Best Embroidery Size for Text on a Cap?
Text needs special attention.
The ideal size depends on the font, letter shape, thread thickness, spacing, and placement.
Bold fonts generally work better than very thin decorative fonts.
For example, a strong sans-serif wordmark can remain readable at a relatively small size, while a thin script font may lose important details.
When designing embroidered cap text, consider:
- Letter height
- Stroke thickness
- Letter spacing
- Font style
- Thread colour
- Background colour
- Number of words
- Placement
If you want a long phrase, it may be better to place it across the front rather than trying to squeeze it into a small side or back location.
For the back arch, short phrases usually produce the cleanest results.
Does the Type of Cap Affect Embroidery Size?
Absolutely.
Different cap styles have different structures, and this affects the available embroidery space.
At Custom Cap UK, customers can choose from several cap styles, including baseball caps, embroidered caps, snapbacks, trucker caps, fitted caps, dad caps, 5-panel caps, 6-panel caps, and other headwear options.
5-Panel Caps
Five-panel caps often have a broad front panel without a central seam running directly through the middle of the embroidery area.
This can make them particularly attractive for logos and larger graphic designs.
6-Panel Caps
Six-panel caps typically have a seam arrangement that can affect the centre front embroidery area.
The design needs to be positioned carefully so important elements do not cross an unsuitable seam.
Some embroidery providers specifically note that the centre seam on six-panel caps can make intricate designs more challenging.
Trucker Caps
Trucker caps usually have a structured front section with mesh panels at the back.
The front panel can provide a strong area for bold embroidery, while the mesh construction means that certain embroidery placements are not suitable for every part of the cap.
Dad Caps
Dad caps have a relaxed, softer structure.
They can produce a stylish embroidered finish, particularly for minimalist logos, names, initials, and casual branding.
Because the crown is softer, extremely large or dense embroidery may affect the appearance of the fabric.
Fitted Caps
Fitted caps provide a clean, structured appearance and are popular for sports, fashion, and premium branding.
The embroidery should be designed according to the specific crown construction and available front panel area.
Structured vs Unstructured Caps for Embroidery
The structure of a cap can influence how embroidery looks.
Structured caps usually contain additional support inside the front panels. This creates a firmer surface for embroidery and can help maintain a crisp appearance.
Unstructured caps are softer and more flexible.
They can still produce excellent embroidery, but the design should complement the relaxed shape of the cap.
For example, a minimalist logo can look particularly effective on an unstructured dad cap.
A large, highly detailed design may require more careful consideration.
How Many Stitches Are Too Many for a Cap?
There is no universal stitch-count number that automatically means a design is too large.
The more useful question is whether the embroidery density is appropriate for the fabric and design.
A design that is extremely dense may cause:
- Heavy stitching
- Fabric distortion
- Puckering
- Reduced flexibility
- An overly bulky appearance
- Longer production time
A professional digitiser can adjust stitch density, underlay, stitch direction, and other elements to create a better balance.
This is why simply uploading a high-resolution PNG is not enough.
The artwork needs to be prepared specifically for embroidery.
Flat Embroidery vs 3D Puff Embroidery
The type of embroidery also affects how much detail can be included.
Flat Embroidery
Flat embroidery is the traditional embroidery technique where stitches sit relatively close to the surface of the fabric.
It is suitable for:
- Logos
- Text
- Icons
- Detailed branding
- Multi-colour designs
Flat embroidery generally offers more flexibility for detailed artwork.
3D Puff Embroidery
3D puff embroidery uses foam underneath the stitches to create a raised appearance.
It is particularly effective for:
- Bold lettering
- Initials
- Simple logos
- Sports branding
- Fashion designs
However, very fine details are not ideal for puff embroidery.
Because the design is physically raised, shapes need to be bold enough to produce a clean three-dimensional effect.
For example, a thick letter “M” may look excellent in 3D puff, while a thin script word containing tiny internal spaces may not.
Can a Logo Be Too Detailed for Cap Embroidery?
Yes, but that does not necessarily mean it cannot be used.
Sometimes the solution is simply to create an embroidery-specific version of the logo.
For example, your original brand artwork might contain:
- A detailed illustration
- Three lines of small text
- Multiple gradients
- Thin outlines
- Tiny decorative elements
Instead of reproducing every element exactly, the embroidery version can use:
- Simplified shapes
- Stronger outlines
- Larger lettering
- Fewer tiny details
- Fewer unnecessary colour changes
This allows the final cap to preserve the identity of the original logo while making it suitable for thread.
This process is especially useful for businesses whose logos were originally designed for websites, packaging, or digital advertising rather than textiles.
How Much Embroidery Can Fit on Different Cap Areas?
Here is a practical starting guide:
| Cap Location | Typical Starting Area | Best For |
|---|---|---|
| Front | Around 100–115mm wide × 50–65mm high | Main logos, names, graphics |
| Back Arch | Around 90–95mm wide × 30mm high | Slogans, websites, short text |
| Back/Closure Area | Around 50mm × 65mm in some designs | Small logos, initials |
| Side | Around 65mm × 55mm | Icons, initials, small logos |
These measurements are general guidelines rather than universal limits. Actual embroidery space depends on the cap model, panel construction, seams, crown height, closure, and embroidery equipment.
At Custom Cap UK, we can assess your artwork and recommend an appropriate size and placement before production.
How to Make Your Embroidery Fit Better
If your logo is currently too large or complicated, there are several ways to make it more suitable.
1. Simplify the Artwork
Remove unnecessary tiny details while keeping the main visual identity.
2. Shorten the Text
A long company name may work better as initials or a shortened brand name.
3. Use Bold Fonts
Choose fonts with sufficient stroke thickness for embroidery.
4. Increase Letter Spacing
Crowded lettering can become difficult to read when stitched.
5. Choose the Right Placement
Move detailed artwork to the front rather than trying to fit it onto a small side panel.
6. Consider Flat Embroidery
Flat embroidery may be more suitable than puff embroidery for detailed designs.
7. Use a Secondary Placement
Instead of forcing every element into one logo, place the main logo on the front and supporting text on the back.
Should You Embroider the Entire Cap?
Full or extensive embroidery can create a distinctive fashion statement, but it requires much more careful planning than standard logo embroidery.
Traditional cap construction means that embroidery cannot always simply wrap continuously around every panel.
The seams, curvature, crown shape, brim, and machine access all affect where stitching can be placed.
For most businesses, a strategically positioned logo provides a better combination of visibility, cost, durability, and professional appearance.
For fashion brands and special projects, however, multiple embroidery placements can create a more distinctive result.
The key is to design the cap as a complete product rather than treating each embroidery location separately.
Why Your Cap Design Should Be Digitised Professionally
Digitising is one of the most important stages in embroidery production.
A professional embroidery file tells the machine exactly how to create the design.
It determines:
- Stitch type
- Stitch direction
- Stitch density
- Underlay
- Stitch sequence
- Thread changes
- Registration
- Colour order
A poorly digitised design can look disappointing even if the original artwork is excellent.
A professionally digitised design can make a relatively simple logo look premium.
At Custom Cap UK, our design process includes artwork support and professional digital proofing. Customers can provide a logo, artwork, sketch, or concept, and the design team can help prepare the layout before production.
Why a Digital Mockup Matters
Before producing a large order, it is useful to see how your design will look on the actual cap style.
A digital mockup can help you evaluate:
- Logo size
- Position
- Colour contrast
- Front panel balance
- Side placement
- Back text
- Overall appearance
It is much easier to make adjustments digitally than after the embroidery has already been produced.
For example, you may discover that your logo looks better at 90mm wide rather than 110mm, or that a back slogan needs to be shortened.
A professional proofing stage helps prevent those issues.
What Colours Work Best for Cap Embroidery?
Colour choice can dramatically affect how large an embroidery design appears.
High-contrast combinations are usually easier to see.
For example:
- White embroidery on black
- Black embroidery on white
- Gold embroidery on navy
- White embroidery on red
- Black embroidery on beige
However, subtle colour combinations can also create premium fashion aesthetics.
The important factor is contrast between the thread and cap fabric.
If your design contains several colours, it is worth considering whether every colour is necessary.
A simplified two- or three-colour embroidery can sometimes look cleaner than a complicated multi-colour design.
Can You Embroider a Photograph on a Cap?
Photographs are difficult to reproduce as traditional embroidery because embroidery uses thread rather than continuous photographic pixels.
A photo can sometimes be converted into a stylised embroidered design, but the image usually needs to be simplified.
Portraits and illustrations work best when they have:
- Strong outlines
- Clear shapes
- Good contrast
- Limited fine detail
- Recognisable features
If you want a highly detailed image, another decoration method may sometimes be more suitable.
The right solution depends on the artwork and the desired appearance.
What Is the Best Size for a Business Logo on a Cap?
For most business logos, the front of the cap is the strongest placement.
A starting size of approximately 4 inches wide works well for many horizontal logos, although the final size should be adjusted to suit the specific cap and artwork.
If the logo is compact, it may not need to use the full available width.
The most important consideration is recognition.
Someone should be able to look at the cap from a reasonable distance and understand the brand identity without struggling to read or interpret the embroidery.
For corporate uniforms, promotional merchandise, and branded workwear, consistency is particularly important.
Using the same logo proportions and embroidery placement across your cap range helps create a more professional brand appearance.
What Is the Best Size for a Fashion Logo?
Fashion brands often take a different approach.
Instead of using a large front logo, a smaller embroidered mark can create a more understated premium look.
For example:
Front: Small centred icon
Side: Initial
Back: Minimal brand name
This creates a sophisticated appearance without making the cap feel overly promotional.
The ideal size depends heavily on your brand identity.
A sportswear company may prefer bold, large embroidery, while a luxury-inspired fashion label may prefer smaller, cleaner details.
Embroidery for Sports Teams and Clubs
Sports teams often benefit from larger front embroidery because logos need to be highly visible.
A typical arrangement could include:
Front: Team logo
Side: Player number or small emblem
Back: Team name or sponsor
For sportswear, bold shapes and high-contrast thread colours tend to work particularly well.
3D puff embroidery can also create a strong raised effect for team initials and simple logos.
However, detailed team crests should be assessed individually because very small elements may need to be simplified.
Embroidery for Corporate and Promotional Caps
Businesses commonly use embroidered caps for:
- Staff uniforms
- Trade shows
- Promotional campaigns
- Customer giveaways
- Outdoor teams
- Construction companies
- Hospitality businesses
- Events
- Corporate merchandise
The advantage of embroidery is its durable, professional appearance.
A well-produced embroidered logo can give a simple cap a much more premium feel.
For corporate use, we recommend prioritising readability and consistency over excessive detail.
What If Your Logo Does Not Fit?
Do not worry if your artwork does not immediately fit the available embroidery area.
There are several solutions.
Our design team can help adjust:
- Size
- Proportions
- Text
- Layout
- Line thickness
- Detail
- Placement
- Colour selection
At Custom Cap UK, design assistance includes artwork vectorisation, colour matching, and layout support, helping customers prepare artwork for production.
The goal is not simply to make your logo smaller.
The goal is to make it work as embroidery.
The Golden Rule of Cap Embroidery
The golden rule is simple:
Do not design for the screen. Design for the thread.
Your logo may look perfect on a computer monitor, but a cap is a three-dimensional textile surface.
It curves.
It has seams.
It stretches.
It contains different materials.
And embroidery is created using physical thread.
Once you understand these differences, it becomes much easier to create artwork that looks excellent in production.
Final Thoughts: How Much Embroidery Can Fit on a Cap?
So, how much embroidery can fit on a cap?
For many standard caps, a practical front embroidery design is approximately 4–4.5 inches wide and 2–2.5 inches high, but there is no universal maximum. The actual embroidery area depends on the cap style, panel construction, seams, crown height, design shape, and the embroidery method being used.
The back and side areas are generally smaller and are better suited to short text, initials, symbols, or compact logos.
The amount of embroidery you can successfully fit is also influenced by stitch count and design complexity. A large but simple logo may be easier to embroider than a small design packed with tiny details.
The best embroidered caps are not necessarily those with the largest designs. They are the ones where size, placement, detail, colour, and cap construction work together.
Whether you need branded caps for your company, custom headwear for a sports team, promotional merchandise for an event, or a fashion collection for your brand, choosing the right embroidery size is one of the most important steps in achieving a professional result.
If you’re unsure how large your logo should be, send us your artwork and the cap style you have in mind. We can help determine a suitable embroidery size and placement so your finished caps look clean, balanced, and professionally made.
Your logo doesn’t need to fill the entire cap to make an impact. It just needs the right size, the right placement, and the right embroidery treatment.